Windows v7 Client (obsolete)
Table of Contents
Express Installation – Recommended! (All Users)
This section describes the recommended method for installing the V7 FAH software for individual FAHClient slot(s) on Windows XP and newer. A first time installation is assumed. And unless otherwise noted, the default setting for each option is the recommended setting.
Download the V7 Installer from here (see figure 1). The installer includes the new Web Control (client manager) interface software, the new FAHClient (slot manager) software, and the new FAHViewer (viewer) software. The optional FAHClient (advanced client manager) is also included.
Double-click the Installer icon to start the software installation.
A security warning prompt may be displayed (see figure 2).
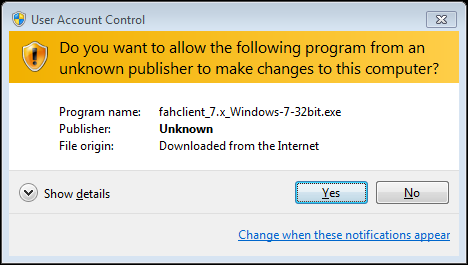
If prompted, click Run or click Yes to acknowledge the warning and continue the installation.
The welcome screen is displayed (see figure 3).

Click Next to continue the installation.
Read the License Agreement (see figure 4).
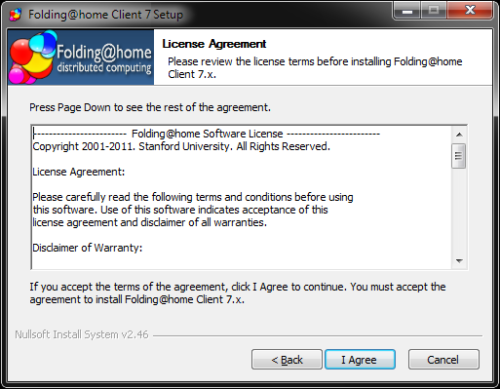
If agreeable, click I Agree to continue.
The Installer Mode option screen is displayed (see figure 5).
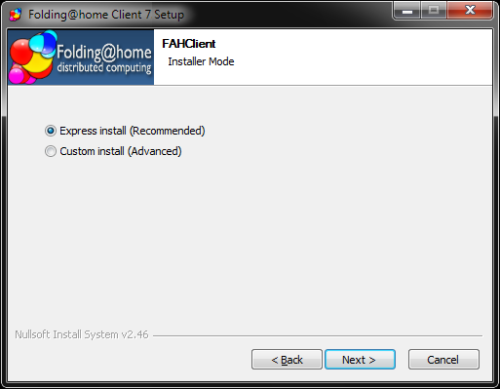
Click Next to continue the Express (Recommended) installation.
Note: Express Install will automatically install one or more FAHClient slots to match the computer hardware detected. If multiple CPU cores are detected, an multicore CPU slot is installed, otherwise a single core CPU slot is installed as the fall back option. If one or more GPUs are detected, one or more GPU slots are also installed automatically. If neither multicores or GPU are detected, a single core CPU slot is installed by default. The separate SMP and Uniprocessor slot types are now combined and known as a CPU slot, supporting one to many CPU cores.
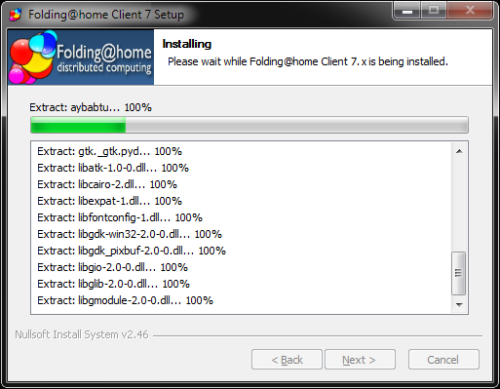
Please wait while the installation finishes (see figure 6).
V7 installation is almost complete (see figure 7).
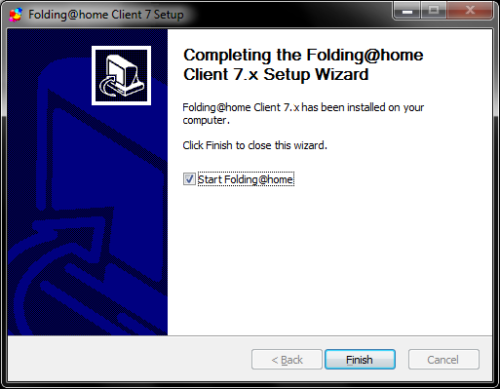
Note: Do not uncheck the box to Start Folding@home so the software will start automatically with Windows. If unchecked, FAHClient will need to be started manually each time.
Click Finish.
A prompt from Windows Firewall or another security software may be displayed (see figure 8).
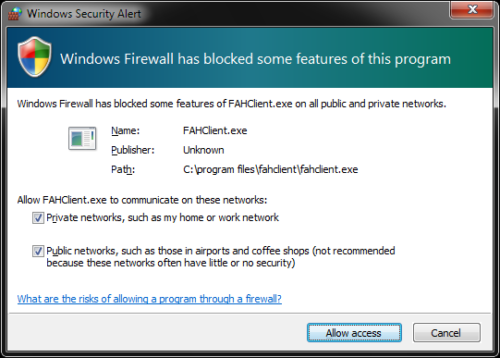
If prompted, select Unblock or Allow Access for V7 software to connect to the internet.
The Web Control (client manager) interface will start automatically after a few seconds. The Web Control page will prompt to configure a FAH user identity (see figure 9).
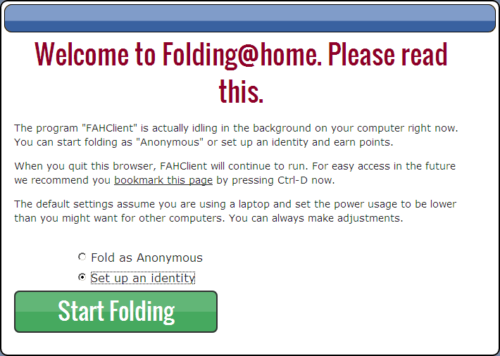
Click the Set up an Identity radio button unless choosing to fold Anonymously.
Click the Start Folding button after making a selection.
The Web Control Change Identity window is displayed (see figure 10).
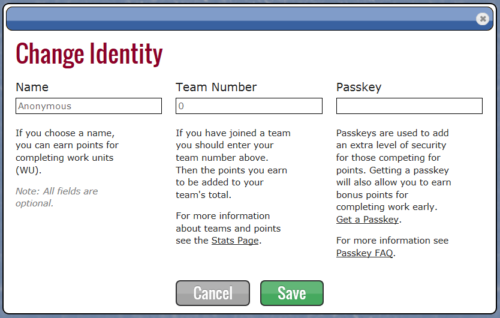
Enter a FAH user Name, Team #, and Passkey as needed. Always use a Passkey.
Note: Using a Passkey adds an extra level of security, and is also a requirement to receiveQuick Return Bonus points.
Click Save to continue.
The Web Control Home tab is displayed (see figure 11).
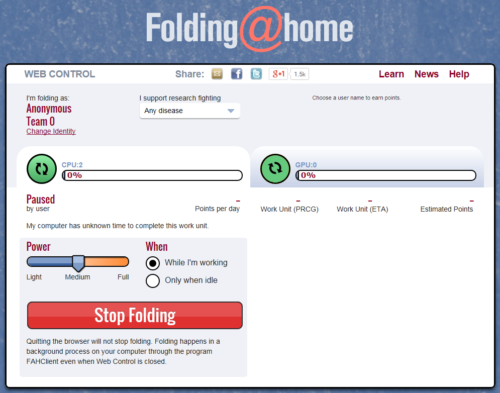
V7 software is now installed and folding.
Note: Move the Power Slider to Full for maximum production.
Please read the V7 Introduction page for basic information and further explanations of the new client features.
See also the FAHControl (client manager), FAHClient (slot), and FAHViewer (viewer) documents for more information about setup and customization options.
While the default options are typically the recommended options, see the ConfigurationFAQ for additional setup options.
Custom Installation – Optional (Advanced Users)
This section describes V7 FAH custom options available when installing FAHClient slot(s) on Windows XP and newer. This procedure assumes advanced knowledge of Windows and V7 Folding@home software. A first time installation is assumed, and unless otherwise noted, the default setting for each option is the recommended setting.
Note: To install a V7 FAHClient slot to run as a service (an option a bit later in the setup), the Windows XP user account running the installer must have Administrator privileges. In Windows Vista and newer, the installer must be opened with the Run As Administrator option. Do this by right-clicking on the installer icon and then click Run as Administrator. If prompted for an administrator password or confirmation, enter the password or provide confirmation. If a service install is the goal, this would be a good time to change to a user account with Administrative rights in XP, or to use the Run As option in Vista/7/8.
Note: Windows Vista, Windows 7/8, and newer do not support running a GPU FAHClient slot as a service (a Microsoft security limitation).
Download the V7 Installer from here (see figure 1). The installer includes the new simpler Web Control (client manager), the new FAHClient (slot) software, and the new FAHViewer (viewer) software. V7 also includes the optional FAHControl (advanced client manager) interface software.
Double-click the Installer icon to start the software installation.
A security warning prompt may be displayed (see figure 2).
If prompted, click Run or click Yes to acknowledge the warning and continue the installation.
The welcome screen is displayed (see figure 3).
Click Next to continue the installation.
Read the License Agreement (see figure 4).
If agreeable, click I Agree to continue.
The Installer Mode option screen is displayed (see figure 5).

Select the Custom Install (Advanced) option as pictured. Click Next to proceed.
The Choose Users screen is shown (see figure 6).
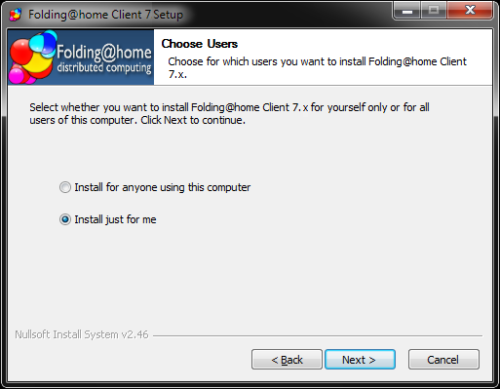
Select an option for which users will run V7 software. Install just for me is recommended. Click Next.
The client location screen is shown (see figure 7).
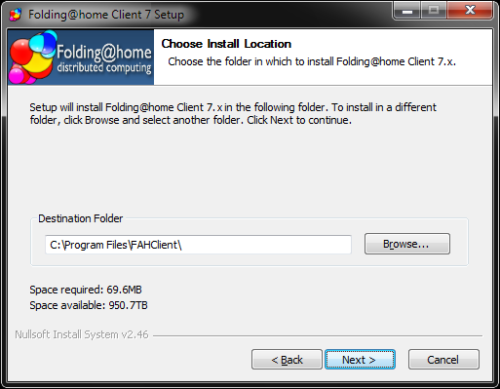
An alternate destination folder may be entered, but this default is recommended. Click Nextto continue.
The client data files location screen is shown. The current Windows account name will appear in place of [User_Name] (see figure 8).
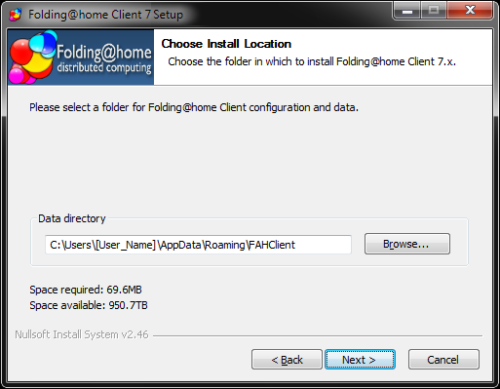
An alternate data directory folder may be entered for V7 configuration and data files location. However, this is the recommended default. Click Next.
The Start Software options are displayed (see figure 9). These are very important for determining how the FAHClient will start. It also selects if and how the FAHClient slots are controlled and monitored by FAHControl on this computer.

How would you like to start the folding client?
The options pictured in figure 9 match the default settings used in the Express install, and are the recommended settings. Or select custom startup options below.
- The first option sets the FAHClient slot(s) to start at Windows login. Any FAHClient slot is only visible in the Web Control or Advanced Control interfaces.
- The second option sets the FAHClient slot to run as a service, and is only visible in the FAHControl interface. Service Mode is not available to GPU clients in Windows Vista and Windows 7/8 (a Microsoft security limitation).
- The third option is used to start the FAHClient manually from a shortcut.
- This check box enables the Folding@home screensaver. It is a recommended option, but may use some computer resources that might otherwise be used for folding, depending on the system configuration.
Note: The installer will automatically install one or more FAHClient slots to match the computer hardware detected. If multiple CPU cores are detected, an a multi-core CPU slot is installed, otherwise a single core CPU slot is installed as the fall back option. If one or more GPUs are detected, one or more GPU slots are also installed automatically. If neither multicores or GPU are detected, a single CPU slot is installed by default.
Note: This section describes how to add an additional slot: Multi-client Installation – Adding slots
Click Install to continue.
Please wait while Folding@home is finishing the installation (see figure 10).
V7 client installation is almost complete (see figure 11).
Note: Do not uncheck the box to Start Folding@home so the software will start automatically with Windows. If unchecked, FAHClient will need to be started manually each time.
Click Finish.
A prompt from Windows Firewall or another security software may be displayed (see figure 12).
If prompted, select unblock or Allow access for V7 software to connect to the internet.
The Web Control (client manager) interface will start automatically after a few seconds. The Web Control page will prompt to configure a FAH user identity (see figure 14).
Click the Set up an Identity radio button unless choosing to fold Anonymously.
Click the Start Folding button after making a selection.
The Web Control Change Identity window is displayed(see figure 15).
Enter a FAH user Name, Team #, and Passkey as needed. Always use a Passkey.
Note: Using a Passkey adds an extra level of security, and is also a requirement to receiveQuick Return Bonus points.
Click Save to continue.
The Web Control Home tab is displayed (see figure 16).
V7 software is now installed and folding.
Note: Move the Power Slider to Full for maximum production.
Please read the V7 Introduction page for basic information and further explanations of the new client features.
See also the FAHControl (client manager), FAHClient (slot), and FAHViewer (viewer) documents for more information about setup and customization options.
While the default options are typically the recommended options, see the ConfigurationFAQ for additional setup options.
Multi-client Installation – Adding slots (Expert Users)
This section describes how to add one or more additional FAHClient slots for Windows XP and newer using the FAHControl interface. When mixing GPU and CPU slots, the setup is quicker and easier to use the V7 installer to add both at the same time. Even after a hardware upgrade, uninstalling and reinstalling is often easier and faster for adding slots for the new hardware.
In the rare event the installer does not add a slot, the procedure to add a slot manually is shown below.
This procedure assumes expert user knowledge of Windows and V7 Folding@home software, and at least one other working and running FAHClient slot. Unless otherwise noted, the default setting for each option is the recommended setting.
Note: Additional slots can be added manually by editing the FAHClient configuration file. However, this is very risky as incorrect settings or typing mistakes may cause the current work unit to abort, the client to crash, or future points to be credited to someone else.
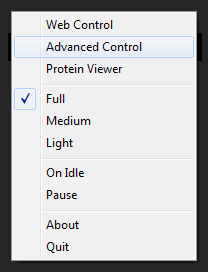
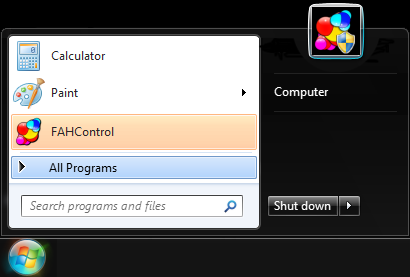
The recommended procedure for adding additional FAHClient slots is through the FAHControl Configuration settings. Right-click the FAH system tray icon to open Advanced Control (see figure 1).
The FAHControl interface is displayed (see figure 2).
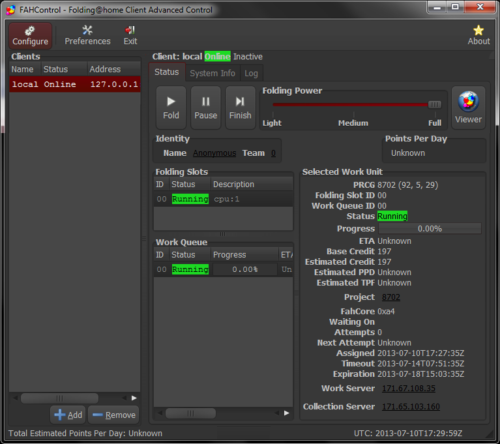
Click the Configure button (on toolbar).
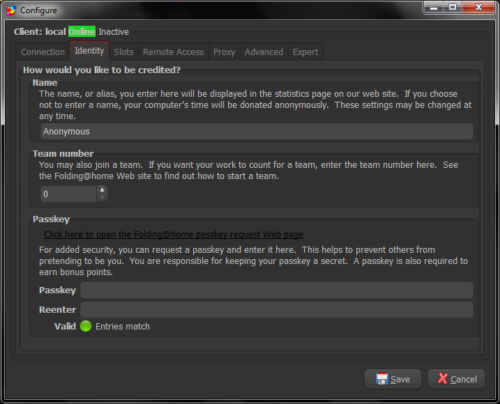
The Configure window and Identity tab are displayed by default (see figure 3).
Select the Slots tab.
The current Folding Slots are listed (see figure 4).
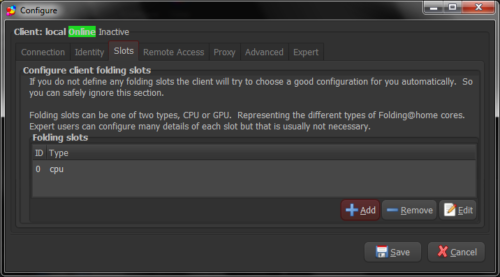
Click the Add button.
The Configure Folding Slots screen is displayed (see figure 5).
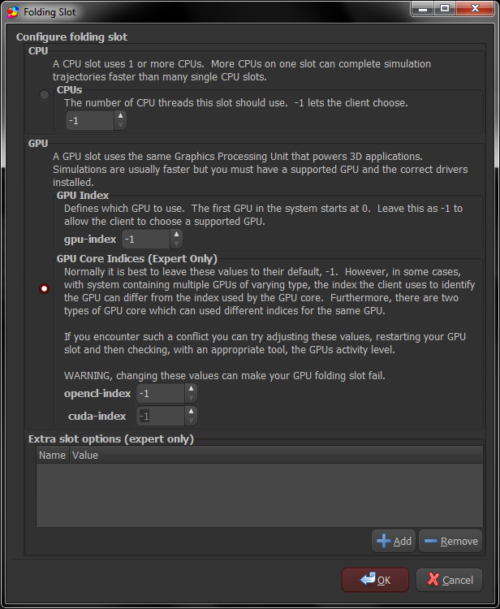
Select the slot type to be added, CPU or GPU. When adding a CPU slot, please select the correct number of processing cores to match the computer. When adding a GPU slot, the recommended setting is -1 as the client will autodetect the correct GPU device number.
Click OK to continue. The Slots tab is displayed again, with the new FAHClient slot in the list (see figure 6).
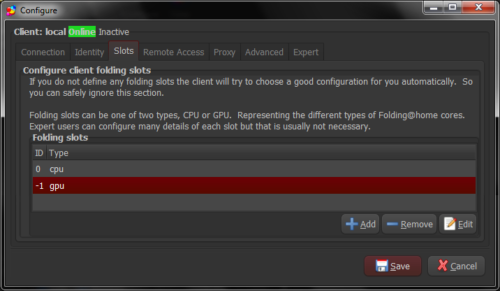
Repeat as needed to add additional new FAHClient slots, or click Save to finish the configuration and return to the main FAHControl screen.
Note: The new FAHClient slots will use the same performance settings (CPU percentage, Checkpoint frequency, etc.) as defined on the Advanced Tab of the Configuration settings.
The new slot will download a new work unit and starting folding automatically.
Exit the FAHControl application when done.
Command Line Only Option
The command line only stand alone FAHClient tarball is available for download from here.
Note: There is no install guide or support in the forum for this type of expert only installation. The only support for command-line only installs is this:
Documentation:
FAHClient --help
Configuration using config.xml:
FAHClient --configure
Configuration with no config file (minimum flags):
FAHClient --user=Anonymous --team=0 --passkey=1385yourpasskeyhere5924 --gpu=true --smp=true
How to Uninstall V7 – Partial (for Upgrades) or Complete Removal
This section describes how to uninstall V7 FAH application, either partially for upgrading the V7 software version, or completely for a full removal of the software.
Please exit the application, then begin (see figure 1).

Click on the Start button.
The Programs menu is displayed (see figure 2).
Click on the All Programs menu. It will expand to show more items (see figure 3).
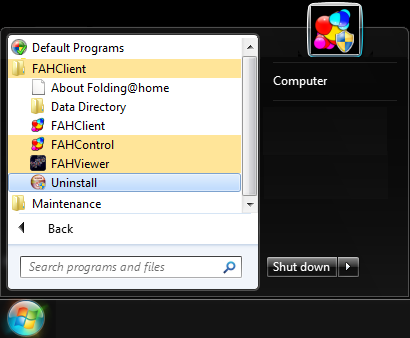
Click on FAHClient menu. It will expand to show more items (see figure 3). Click on Uninstall menu item.
A security warning prompt may be displayed (see figure 4).
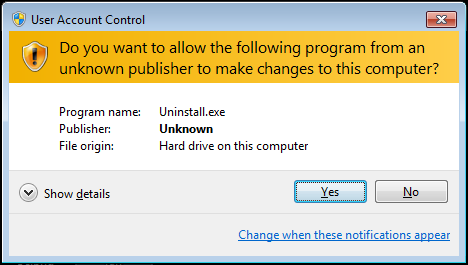
If prompted, click run or Yes to acknowledge the warning to continue the uninstall.
The optional components screen is displayed (see figure 5).
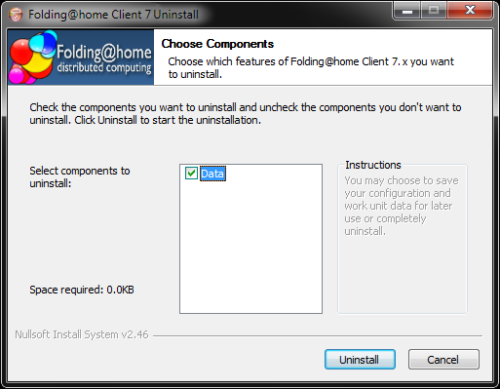
The Data component consists of the current work unit if any, log files, fahcores, and FAHClient slot configuration. Check the box for Data to have these removed as well. If only uninstalling and reinstalling, or upgrading versions, do NOT check the data box to keep the data files and client configuration.
Click the Uninstall button to continue.
Note: If FAHControl or a FAHClient slot is still running, a prompt to Please stop all running Folding@home software is shown. Please exit all FAH software. Then click Retry to continue.
Please wait as the files are deleted or removed (see figure 6).
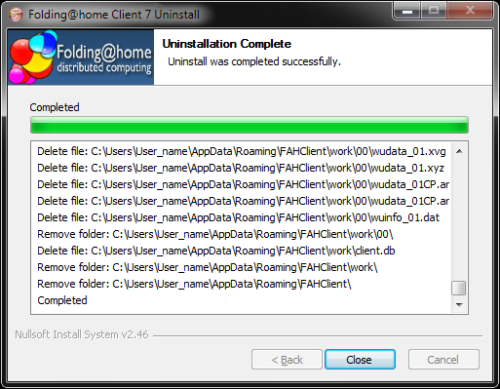
Click Close when prompted.
Uninstall is complete.